Sebelum menginstal phpMyAdmin, pastikan bahwa anda sudah mengintal Apache Server, PHP dan MySQL.
Klik link berikut untuk mendownload phpMyAdmin http://www.phpMyAdmin.net

Klik download, kemudian pilih tipe file, dalam hal ini kita akan memilih “all-language-zip” agar bisa menggunakan Bahasa Ibu kita.

Setelah filenya selesai kita download, dengan menggunakan winzip atau winnar ekstrak file tersebut ke dalam folder “documentroot” atau “C:\My Websites\” yang telah kita buat sebelumnya, sehingga nanti file-file tersebut akan berada di folder “C:\My Websites\phpMyAdmin-2.11.5.2-all-languages” seperti kita lihat nama folder tersebut terlalu panjang dan rumit, jadi agar lebih simpel dan gampang diingat ganti nama folder tersebut menjadi phpMyAdmin, sehingga akan menjadi “C:\My Websites\phpMyAdmin.”
Buka Notepad salin code berikut:
/* vim: set expandtab sw=4 ts=4 sts=4: */
/**
* phpMyAdmin sample configuration, you can use it as base for
* manual configuration. For easier setup you can use scripts/setup.php
*
* All directives are explained in Documentation.html and on phpMyAdmin
* wiki .
*
* @version $Id: config.sample.inc.php 10142 2007-03-20 10:32:13Z cybot_tm $
*/
/*
* This is needed for cookie based authentication to encrypt password in
* cookie
*/
$cfg['blowfish_secret'] = ”; /* YOU MUST FILL IN THIS FOR COOKIE AUTH! */
/*
* Servers configuration
*/
$i = 0;
/*
* First server
*/
$i++;
$cfg['Servers'][$i]['user'] = ‘root’;
$cfg['Servers'][$i]['password'] = ‘xxx’; // Ganti xxx dengan MySQL Password
/* Authentication type */
$cfg['Servers'][$i]['auth_type'] = ‘config’;
/* Server parameters */
$cfg['Servers'][$i]['host'] = ‘localhost’;
$cfg['Servers'][$i]['connect_type'] = ‘tcp’;
$cfg['Servers'][$i]['compress'] = false;
/* Select mysqli if your server has it */
$cfg['Servers'][$i]['extension'] = ‘mysql’;
/* User for advanced features */
$cfg['Servers'][$i]['controluser'] = ‘root’;
$cfg['Servers'][$i]['controlpass'] = ‘xxx’; // Ganti xxx dengan MySQL Password
/* Advanced phpMyAdmin features */
$cfg['Servers'][$i]['pmadb'] = ‘phpmyadmin’;
$cfg['Servers'][$i]['bookmarktable'] = ‘pma_bookmark’;
$cfg['Servers'][$i]['relation'] = ‘pma_relation’;
$cfg['Servers'][$i]['table_info'] = ‘pma_table_info’;
$cfg['Servers'][$i]['table_coords'] = ‘pma_table_coords’;
$cfg['Servers'][$i]['pdf_pages'] = ‘pma_pdf_pages’;
$cfg['Servers'][$i]['column_info'] = ‘pma_column_info’;
$cfg['Servers'][$i]['history'] = ‘pma_history’;
$cfg['Servers'][$i]['designer_coords'] = ‘pma_designer_coords’;
/*
* End of servers configuration
*/
/*
* Directories for saving/loading files from server
*/
$cfg['UploadDir'] = ”;
$cfg['SaveDir'] = ”;
?>
Setelah mengisikan password MySQL, simpan file tersebut ke folder “phpMyAdmin” atau ke “C:\My Websites\phpMyAdmin” dengan nama “config.inc.php”
Selanjutnya buka file pengaturan php.ini (C:\Apache Server\php\php.ini),
Di bawah Dynamic Extensions cari kedua extension berikut ini:
;extension=php_mbstring.dll
;extension=php_mcrypt.dll
Hilangkan titik koma “;” yang berada di depannya untuk mengaktifkan:
extension=php_mbstring.dll
extension=php_mcrypt.dll
Simpan file tersebut kemudian restart server.
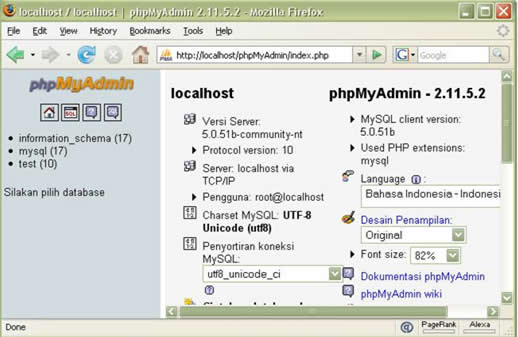
Sekarang buka browser ketik “http://localhost/phpMyAdmin” di address bar, dan Enter.

ref
Klik link berikut untuk mendownload phpMyAdmin http://www.phpMyAdmin.net

Klik download, kemudian pilih tipe file, dalam hal ini kita akan memilih “all-language-zip” agar bisa menggunakan Bahasa Ibu kita.

Setelah filenya selesai kita download, dengan menggunakan winzip atau winnar ekstrak file tersebut ke dalam folder “documentroot” atau “C:\My Websites\” yang telah kita buat sebelumnya, sehingga nanti file-file tersebut akan berada di folder “C:\My Websites\phpMyAdmin-2.11.5.2-all-languages” seperti kita lihat nama folder tersebut terlalu panjang dan rumit, jadi agar lebih simpel dan gampang diingat ganti nama folder tersebut menjadi phpMyAdmin, sehingga akan menjadi “C:\My Websites\phpMyAdmin.”
Buka Notepad salin code berikut:
/* vim: set expandtab sw=4 ts=4 sts=4: */
/**
* phpMyAdmin sample configuration, you can use it as base for
* manual configuration. For easier setup you can use scripts/setup.php
*
* All directives are explained in Documentation.html and on phpMyAdmin
* wiki .
*
* @version $Id: config.sample.inc.php 10142 2007-03-20 10:32:13Z cybot_tm $
*/
/*
* This is needed for cookie based authentication to encrypt password in
* cookie
*/
$cfg['blowfish_secret'] = ”; /* YOU MUST FILL IN THIS FOR COOKIE AUTH! */
/*
* Servers configuration
*/
$i = 0;
/*
* First server
*/
$i++;
$cfg['Servers'][$i]['user'] = ‘root’;
$cfg['Servers'][$i]['password'] = ‘xxx’; // Ganti xxx dengan MySQL Password
/* Authentication type */
$cfg['Servers'][$i]['auth_type'] = ‘config’;
/* Server parameters */
$cfg['Servers'][$i]['host'] = ‘localhost’;
$cfg['Servers'][$i]['connect_type'] = ‘tcp’;
$cfg['Servers'][$i]['compress'] = false;
/* Select mysqli if your server has it */
$cfg['Servers'][$i]['extension'] = ‘mysql’;
/* User for advanced features */
$cfg['Servers'][$i]['controluser'] = ‘root’;
$cfg['Servers'][$i]['controlpass'] = ‘xxx’; // Ganti xxx dengan MySQL Password
/* Advanced phpMyAdmin features */
$cfg['Servers'][$i]['pmadb'] = ‘phpmyadmin’;
$cfg['Servers'][$i]['bookmarktable'] = ‘pma_bookmark’;
$cfg['Servers'][$i]['relation'] = ‘pma_relation’;
$cfg['Servers'][$i]['table_info'] = ‘pma_table_info’;
$cfg['Servers'][$i]['table_coords'] = ‘pma_table_coords’;
$cfg['Servers'][$i]['pdf_pages'] = ‘pma_pdf_pages’;
$cfg['Servers'][$i]['column_info'] = ‘pma_column_info’;
$cfg['Servers'][$i]['history'] = ‘pma_history’;
$cfg['Servers'][$i]['designer_coords'] = ‘pma_designer_coords’;
/*
* End of servers configuration
*/
/*
* Directories for saving/loading files from server
*/
$cfg['UploadDir'] = ”;
$cfg['SaveDir'] = ”;
?>
Setelah mengisikan password MySQL, simpan file tersebut ke folder “phpMyAdmin” atau ke “C:\My Websites\phpMyAdmin” dengan nama “config.inc.php”
Selanjutnya buka file pengaturan php.ini (C:\Apache Server\php\php.ini),
Di bawah Dynamic Extensions cari kedua extension berikut ini:
;extension=php_mbstring.dll
;extension=php_mcrypt.dll
Hilangkan titik koma “;” yang berada di depannya untuk mengaktifkan:
extension=php_mbstring.dll
extension=php_mcrypt.dll
Simpan file tersebut kemudian restart server.
Sekarang buka browser ketik “http://localhost/phpMyAdmin” di address bar, dan Enter.

ref
Komentar